mercredi 29 février 2012

How To Find the right type of Adsense Design

Let’s face the fact. Everyone wants to get the most clicks from adsense to make the most money. It is important to know where and what type of ad unit to place on your site. Therefore, place your google ads strategically and blend them into your site so that your site’s conversion rate is as high as possible.

However, do take note that Google has a limit to how many ads can be placed on a single page and too many ads will turn away your visitors. In addition, users that click on those ads usually don’t return back to your site, so having too many ads may not be necessarily good.
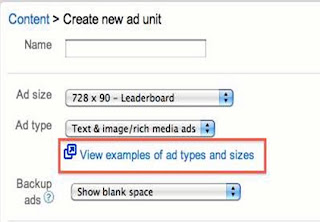
When creating an ad unit with Google Adsense, you can choose the type of ad which will appear in the unit.The three options are:
1.
Text & image/rich media ads.
2.

Text ads only.
3.
Image/rich media ads only.Thus, you may face the dilemma of choosing the most suitable ad type for your site. The answer is “it depends”. There is no “best” ad type for certain type of sites. You will have to try them out yourself to see which type gets the highest conversion rates.
However, I recommend using “Link Ads” for your Google ads as they are the easiest way to blend into your site. Take a look at the photo below
From this site, you can see the “Link Ads” at the top of the post seem to blend in better compared to the “Text Ads” at the bottom of the article.
As such, the conversion rates for the “Link Ads” on this page would definitely be higher than the conversion rates for “Text Ads”.
Thus, blending your ads into your site is the most important factor when choosing the right type of Adsense design.

Getting Started With Adsense

Getting Started With Adsense

First, You will need to sign up with to have an account. Its Google Adsense free and relatively simple to do so. You will see a similar page to the one
shown below:


Just fill up accordingly to how I did and click on
the “submit” button! After you have logged into your account, you will be taken to the overview page with all the reports and statistics on your ads performances. However, since you've just set up a new account, your page would be rather blank.

To start creating your ads, click on the “My Ads” tab at the top of the page. Your screen should look something like the one below:

This is a list of all your active ads that you have on yo
ur website. Click on the “New ad Unit” tab to start customizing your ad! You can choose the colors, fonts and designs of the ads here. I advise you to click on the “view examples of ad types and sizes” to have an overview of all the different ad designs that Google offers.
You should visualize the banner or text ad on your blog, and seewhether the ad will actually fit into the theme.

How To Find High Converting Keywords For Your Adsense

How To Find High Converting Keywords For Your Adsense

As you know, Google Adsense works by noticing specific keywords from your blog's content, and places ads that are related to your keywords on your blog. These keywords are commonly used throughout your entire blog, and also in your blog's meta tags. As such, in order to have a successful money-making campaign with Google Adsense, you will need to find high converting keywords to optimize Adsense on yourblog!
Always research on the keywords used by your competitors, check out your competitors web pages, especially if they are making a lot of money. Find out what keywords are helping them earn and use those keywords too.
The formula here is simple: Low Competition + Decent PPC +
High Search Volumes = Excellent Keyword(s)
Use Keyword Research Tools like Google Adwords tool or other free keyword tools to help you in searching for the correct keyword. These tools make keyword research faster and more effective. After you have found the main keyword for your content, do include
related words or phrases which your target audience might use to search for the product or service which you provide. Remember, the most expensive clicks may not be the best. Yes, there are clicks which earn you about $50 a click. However, it is not going to help if it is rarely clicked. It doesn’t matter if one click earns you only a $1 a click, if it is click few hundred times a day, it is going to earn you
more revenue in the long run Number of times clicked > Amount earned from each click Therefore, try to find quality keywords that have decent pay per click and high possibility of being clicked by your target audience. If you can optimize this,
then your Adsense conversion rates is going to be very high.

About

About The Author

A.Fethi has lived and studied in Morocco and Nederland. After receiving a degree in

French Literrature and Communication in Morocco he moved to Holland With his wife

Casting Your Nets: Integrating Google Adsense Into Your Blog


Casting Your Nets: Integrating Google Adsense Into Your Blog

Now that your've built your vessel, its time to cast your nets into the ocean! Looking at the screenshot below, you will see the earnings that site
www.aboutteas.com
earned for the month of September which I

had first started out.


Now, that’s quite a feat for a small beginner blog like mine! If you put in hard work into building up your blog, I believe your blog will be able to

earn much more than the figures shown above!


In this section, you will learn all the tips and tricks that I have used to utilize Google Adsense, and also how to optimize your ads to produce better CTRs on your blog.


Providing Quality Content

Providing Quality Content


Once you have installed your theme you are ready to start blogging! You

can click on ‘Add New’ under the ‘Posts’ section in the left hand

navigation and start creating your first post by creating a title and

content.

However, do take note that the content that you provide has to be

unique and engaging. The key to receiving massive traffic and getting

people hooked on to your site is to create content that is not readily

available elsewhere on the Internet. In other words, you should be the

online authority of your specific topic.

To help you with this, I advise you to come up with content that is not

factual, since facts can be readily found anywhere, (plus, its boring).

Instead, come up with instructional posts that can benefit and help

people! You can also create lists posts such as “10 Reasons Why You

Should Drink Green Tea”, or “7 Steps To Making Delicious Tea”. People

generally want to know “how” and “why” when they look or search for

information online, and your blog should be catered to answering these

questions for them!

You will constantly need to update your blog with fresh content perhaps

on a weekly basis so as to produce an incentive for your traffic to revisit

your blog as well. By providing quality content that is beneficial to your

visitors, people will start to link to your site, telling their friends about

you, or even share your site on social media platforms! This means that

you will be generating an influx of traffic to your blog, and a higher

opportunity of these visitors clicking on your ads!

Customizing Wordpress And Finding A Good Theme


Customizing Wordpress And Finding A Good Theme


After registering your domain name and getting a web host, you can now start to customize your blog! Login to your Wordpress admin area.

You can access this page by typing in www.yourdomainmame/wp-admin into your web browser, and you will end up on the page as shown below:

Enter Your username and Password, and then you will come to your

Wordpress Dashboard. This is an overview of your entire administrative

area. You should get familiar with the tools here. To edit the Themes,

click on the 'Appearance' on the left hand side, and select 'Themes' from

the submenu.


There are a number of options for you to install a WordPress theme.

The first is to click on the ‘Install themes’ tab. This will give you access to thousands of free themes that have been created by web developers and made freely available.

You can search by color or style and just click on the install button when you have found something that you like

Another option you can consider is to install a premium theme

Premium Wordpress Themes are definitely well coded, are well

supported, and already made SEO-Friendly. However, these premium

themes might be rather costly, and I advise you to stay with a free

theme if its your first time setting up a website.

You should have a picture of how you want the entire website to look

like in your mind, and search for a perfect theme to fit your needs. For

example, a preference of mine is to utilize a slider to promote my articles

or products on the website. Sliders are a good way to capture the

attention of readers, and there is higher CTRs! Also, I like to use

'magazine styled' themes as I find it neat, and easy to navigate

For free awesome magazine styled themes, I recommend looking at this site :

http://wphacks.com/best-magazine-style-wordpress-themes/

Installing your wordpress themes and customizing it could take you quite awhile, but it is an integral part of making money online.

Your blog will be your source of attraction

– if your blog is not engaging or captivating, you will not have visitors or incoming traffic to your site!


mardi 28 février 2012

How To Obtain A Web Host Service


How To Obtain A Web Host Service


A web host is a service provider t

hat places your web site on a computer

which is connected to the internet. T


his then gives people who surf the


internet a way to access your we

bsite. A web host will typically have a

fast connection to the Internet and they may host thousands of web sites

on many servers. The web ho

st essentially rents out space to you so


that you can get your website up on the world wide web. For me, I have chosen to use due to its effi

cient service, and

http://www.hostgator.com/

cheap rates.

Signing up at Hostgator is re


latively easy. However, you will come to a

page which requires you to selec

t your billing cycle and your coupon

code for further discounts.


If you want to try them for $0.01 for 1 month,

use the coupon code


FREEMONTH

. I have selected 12-months with a

20% discount coupon because

it will be cheaper that way since I will be

with them for a long time.


How To Get Your Discount Coupon:

You just need to Google Search “HostGator Coupon” and click on the

links to find a discount coup

on that best suits your needs. Do take time

to explore as there are quite a number of coupons that you can utilise to

help lower your startup costs.


the specific Coupon

Code into the box as shown below:

Installing Wordpress

Into Control Panel (HostGator)

Once you have regi

stered under Hostgatot, go to your cPanel to install


wordpress into Hostgator. This process is rather simple. But

nevertheless, we will guide you through the entire process too!

So how do you go about installing your wordpress into your cPanel in

HostGator?


1.

After signing up with your web host, you will receive an email

containing your cPanel

login d

etails. Once you have the


username and password, login to your cPanel and you should

see this page. You can also land onto your cPanel by typing

into your web browser.


www.yourdomainname.com/controlpanel

Click On Add Domain Name


You will come to this page...

Then all you have to do is put in your domain name that you have

registered and voila! Add on the domain!

2.

Scroll down and look for an icon called “

Fantastico De Luxe”

which you will use to install your WordPress site.

2.

Scroll down and look for an icon called “

Fantastico De Luxe”

which you will use to install your WordPress site.


3.

To begin your WordPress installation, click on the “WordPress”

link on the left side under the category “Blogs” as shown above.

Afterwhich, you will be directed to this page as shown below.

Select “New Installation”.


4.

You will be directed to this page where you have to fill in several

fields as shown below.


5.

Let us tackle all 6 fields one by one.

#1 Install in directory

– Decide which directory you want your site to be installed in. I recommend installing in the root directory

unless you already have a site using your main domain URL. If

you want to install in the root directory, leave this option blank.

#2 & 3 Admin access data

– Create a username and password

to prove that you have access to the data. Don’t worry toomuch as you can create additional users later.


#4 Admin nickname

– Nothing important, just key in a

nickname which you feel like.

#5 Site name

– What you want your site to be called.

#6 Description

– A short description to describe your site. It

may or may not appear in the header, depending on the theme

which you use.

7.

When you’re done, click on the “Install WordPress” button and

followed by “Finish Installation” in the next page. And there you

have it, you have finished installing wordpress to your site. Just

head over to “www.yourdomainname.com/wp-admin” to login and

work on your blog